
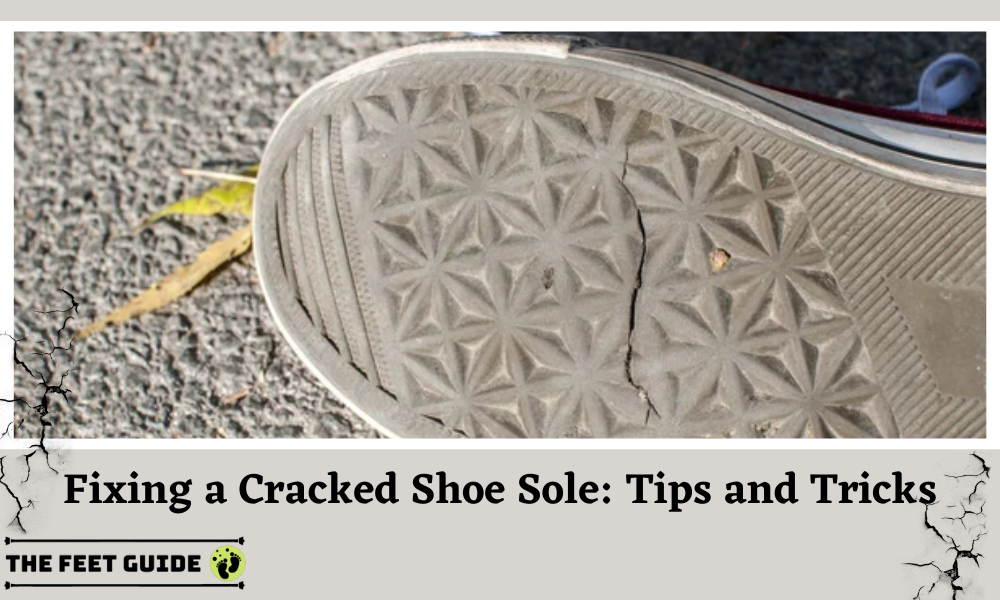
As a shoe lover, there’s nothing more frustrating than a cracked sole on your favorite pair of shoes.
A cracked sole on a shoe can be a frustrating and inconvenient problem. To avoid additional harm and impairment, it’s vital to address this problem as soon as you can.
Fixing a Cracked Shoe Sole doesn’t have to be difficult.
In this article, we will discuss Fixing a Cracked Shoe Sole and the materials needed for the repair.
How Can We Fix a Cracked Sole of a Shoe?
To Fixing a Cracked Shoe Sole:
- Clean the area around the crack
- Apply shoe glue or adhesive
- Hold the sole together and let it dry according to the manufacturer’s instructions
- Once dry, sand down any excess glue
- Apply a sole protector to prevent future cracks.
Let’s Know in Brief For Fixing a Cracked Shoe Sole!!

Assessing the Damage to Shoes
Shoes are really important for our daily lives because they protect our feet from harsh weather conditions and make us feel comfortable while doing our tasks.
However, just like any other object, shoes get damaged over time. It’s crucial to check their condition to decide if they need to be fixed or replaced.
One of the ways to assess the damage to shoes is by identifying the type of sole. The sole is the bottom part of the shoe that comes into contact with the ground.
It is important to check the sole for any signs of wear and tear. If the sole is worn out, it can affect the grip of the shoe, making it slippery and unsafe to wear.
In addition, a worn-out sole can cause discomfort and pain to the feet. Therefore, it is important to replace the sole or the entire shoe if necessary.
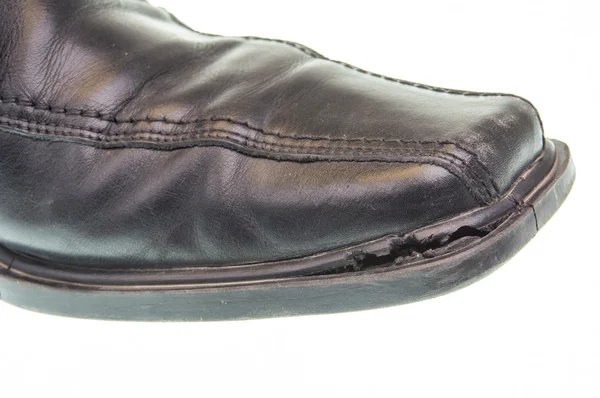
Another way to assess the damage to shoes is by inspecting the crack. A crack is a break or a split in the shoe’s material.
Sole cracks can occur in different parts of the shoe, such as the sole, the upper, or the heel. A crack can be caused by various factors, such as age, wear, and tear, or improper use.
It is important to inspect the crack to determine its severity. If the crack is small and does not affect the functionality of the shoe, it can be repaired.
However, if the crack is large and affects the structure of the shoe, it is best to replace the shoe.
By identifying the type of sole and inspecting the crack, we can determine whether the shoe needs to be repaired or replaced. Looking after our shoes is crucial to guarantee our safety and comfort while carrying out our daily tasks.
Repairing the Crack
Cracks in various objects can be a nuisance, especially when it comes to shoes.
However, repairing the crack is a simple process that can save you money and extend the life of your shoes.
Follow these steps :
Step- 1 Clean the Sole

- This is important because any dirt or debris on the sole can prevent the adhesive from sticking properly.
- To clean the sole, use a damp cloth or sponge to wipe away any dirt or debris.
- Make sure to dry the sole thoroughly before moving on to the next step.
- By cleaning the sole, you are ensuring that the adhesive will bond properly and the crack will be repaired effectively.
Step -2 Apply the Adhesive
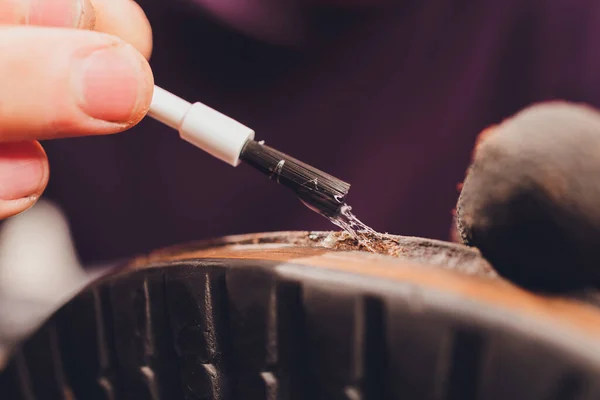
There are many types of adhesive available, but it is important to choose one that is specifically designed for shoe repair.
- Apply the adhesive to the crack, making sure to cover the entire area.
- Use a toothpick or small brush to spread the adhesive evenly.
- Be careful not to apply too much adhesive, as this can cause the sole to become stiff and uncomfortable.
- By applying the adhesive, you are creating a strong bond that will hold the crack together.
Step – 3 Press the Crack Together
This is important because it ensures that the adhesive is evenly distributed and the crack is properly sealed.
- Use your fingers to press the crack together firmly.
- You can also use a clamp or heavy object to hold the crack together while the adhesive dries.
- Allow the adhesive to dry completely before wearing the shoes again.
- By pressing the crack together, you are ensuring that the repair is strong and long-lasting.
By cleaning the sole, applying adhesive, and pressing the crack together, you can create a strong and long-lasting repair.
Don’t let a crack in your shoes cause discomfort or lead to injury. Take the time to repair the crack and enjoy your shoes for years to come.
Reinforcing the Repair
After Fixing a Cracked Shoe Sole, it’s important to reinforce the repair to prevent the issue from happening again.
Consider applying a sole protector or adding a rubber sole to the bottom of the shoe. This will provide added durability and protection for your shoes in the long run.
- Applying a second layer of adhesive will ensure that the shoe is held together firmly. It is important to use a high-quality adhesive that is specifically designed for shoes.
- This will ensure that the adhesive is strong enough to hold the shoe together.
- Add a patch or stitch the crack. This is important because it will provide additional support to the shoe.
A patch can be made from a piece of leather or a similar material. The patch should be cut to the size of the crack and then glued onto the shoe.
- Alternatively, the crack can be stitched together using a needle and thread.
- This will provide additional support to the shoe and prevent the crack from getting worse.
- It is important to let the reinforcement dry for at least 24 hours before wearing the shoe.
This will ensure that the adhesive has fully cured and the reinforcement is strong enough to hold the shoe together.
Finishing Touches: The Importance of Properly Polishing Your Shoes
Once you’ve fixed and reinforced the sole of your shoe, it’s time to add some finishing touches. Polish or clean the shoe to give it a fresh look and protect the leather. Add new laces or insoles for added comfort and style.
Taking these final steps will help prolong the life of your repaired shoes and keep them looking great.
Removing Any Excess Adhesive
When shoes are manufactured, the adhesive is used to hold various parts of the shoe together. However, sometimes excess adhesive is left behind, which can be unsightly and even uncomfortable.
It is important to remove any excess adhesive to ensure that the shoe looks neat and feels comfortable to wear.
This can be done using a small amount of acetone and a cotton swab. Simply apply the acetone to the affected area and gently rub it with the cotton swab until the excess adhesive is removed.
Sanding Down the Sole
The sole of a shoe is the part that comes into contact with the ground. Over time, the sole can become worn down and uneven, which can affect the comfort and stability of the shoe.
Sanding down the sole can help to even it out and restore its grip. This can be done using fine-grit sandpaper.
Simply rub the sandpaper over the sole in a circular motion until it is smooth and even.
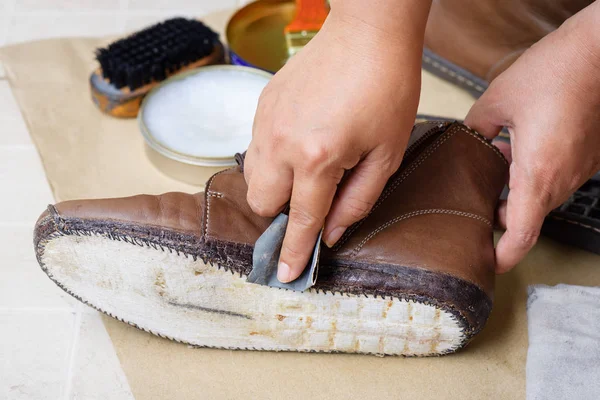
Polishing the Shoe
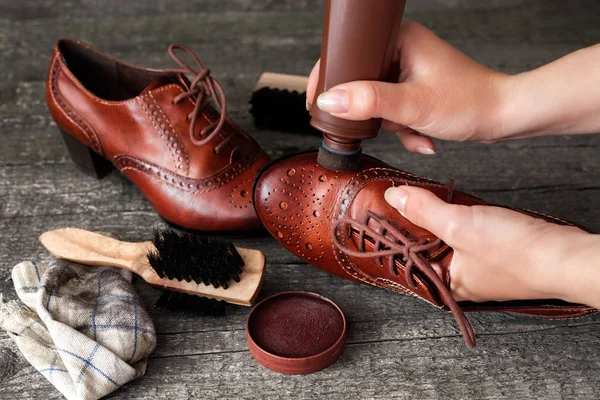
Polishing the shoe is perhaps the most important finishing touch. Polishing your shoes doesn’t just make them look fresh and new, it also shields the leather from damage caused by daily use.
- To polish a shoe, you will need a soft cloth and some shoe polish.
- Apply a small amount of polish to the cloth and rub it into the leather in a circular motion.
- Be sure to cover the entire shoe, including the heel and toe.
- Once the polish has been applied, use a clean cloth to buff the shoe until it shines.
Learn How to Repair Shoes at Home with Easy Tips
Preventing Future Shoe Sole Cracks
To avoid future cracks, keep your shoes clean and dry after every use. Avoid exposing them to extreme heat or moisture, as it weakens the sole material. Regular conditioning and using sole protectors can help maintain flexibility and prevent early damage.
Conclusion
In conclusion, Fixing a Cracked Shoe Sole is a simple process that can save you from having to buy a new pair of shoes. You can fix your shoes and make them look brand new with some simple tools and a bit of patience.
Remember to reinforce the repair and add some finishing touches to protect your shoes and keep them looking their best.
By following these steps, you can extend the life of your favorite shoes and save money in the process.
Walk confidently with our easy fix for a cracked shoe sole! Follow our guide to restore your shoes and strut your stuff once again